
I’ll never forget the sick feeling I got three years ago when my favorite .308 Winchester, a rifle that had been printing consistent half-MOA groups for two seasons suddenly started throwing fliers like a drunk throwing darts. I’d changed nothing. Same ammunition, same shooting position, same everything. Yet groups that should have been touching at 100 yards were suddenly spreading to 1.5 inches with random shots wandering even further. I checked scope rings, action screws, stock bedding, even swapped ammunition lots. Everything checked out fine, but the rifle kept shooting like garbage.
My gunsmith buddy Jeff took one look at my frustration and said, “Have you actually looked inside that barrel?” I told him I’d been cleaning it religiously, patches and brushes after every range session, copper solvent every 200 rounds, the whole routine. He just smiled and handed me his Teslong borescope with the 4.5-inch screen. “Look for yourself,” he said. What I saw made my stomach drop.
The first few inches of my barrel looked like someone had spray-painted the rifling with black lacquer. There was a carbon ring at the throat that was so pronounced it looked like a ridge you could catch your fingernail on. Copper streaks ran through the first six inches like veins of bronze embedded in the steel. This wasn’t light fouling, this was years of accumulated crud that my “thorough” cleaning routine had never actually removed. I’d been running patches through until they came out clean, patting myself on the back for good maintenance, while my barrel was slowly choking itself to death with fouling I couldn’t see.
That moment changed everything about how I approach rifle maintenance. Within a week, I’d ordered my own Teslong Rifle Borescope with 4.5″ Screen, the same model Jeff had, with the 45-inch flexible probe that could inspect any rifle I owned from breech to muzzle. That was three years ago, and this borescope has become the single most valuable tool in my gun cleaning kit. Not my expensive bore guide, not my precision cleaning rods, not even my collection of boutique solvents, this $130 camera that lets me actually see what’s happening inside my barrels.
Unboxing and First Impressions: Better Than Expected

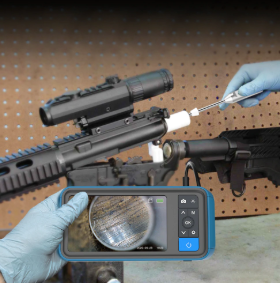
When the Teslong arrived in its padded carrying case, I was genuinely surprised by the presentation. This wasn’t some cheap gadget thrown in a plastic bag—everything came organized in a fitted case with foam inserts that protected each component. The 4.5-inch LCD screen felt solid in my hands, with a weight that suggested quality construction rather than cheap plastic. The screen itself was bright even in my well-lit cleaning room, with surprisingly crisp resolution for the size.
The 45-inch flexible probe was longer than I expected—not floppy like a limp noodle, but with enough rigidity to push through a rifle barrel without collapsing, yet flexible enough to coil into the case for storage. The 0.2-inch diameter meant it would fit down any of my rifles from my .22 LR all the way up to my .338 Winchester Magnum. The probe had a satisfying professional feel to it, with the camera lens protected by a clear window surrounded by six LED ring lights that looked like they could illuminate the darkest corners of any barrel.
The package included three caliber-specific mirrors (.22, .30, and .38 caliber—the sizes I’d use most), a 32GB micro SD card already installed in the screen, USB-C charging cable, and a surprisingly detailed instruction manual that actually helped rather than just being generic boilerplate. The whole setup felt like someone had actually thought about what rifle shooters would need rather than just repackaging an industrial inspection camera for gun use.
What struck me immediately was how self-contained the system was. No smartphone required, no WiFi to connect, no apps to download or fight with. Charge the battery, turn on the screen, plug in the probe, and you’re inspecting barrels. My father, who struggles with anything more complicated than a flip phone, could use this thing without any help. That simplicity turned out to be one of its greatest strengths.
The First Barrel Inspection: A Sobering Education

I decided to start with the .308 that had prompted this whole journey. The rifle that had been shooting poorly despite my “excellent” maintenance. I installed the .30 caliber side-view mirror onto the probe, adjusted the LED brightness to about 60% using the buttons on the screen, and carefully inserted the probe from the breech end with a bore guide protecting the throat.
The learning curve was real but not steep. The first challenge was understanding the focal distance. The camera achieves sharp focus at about half an inch from the barrel surface, which is exactly where the side-view mirror positions it. Looking at the screen while slowly advancing the probe, I had to train myself to rotate the probe systematically to inspect the entire circumference of the barrel. The side-view mirror shows you the rifling in profile—the lands and grooves running lengthwise, which is the only way to really see how fouling accumulates.
What I saw in that first inspection session was both horrifying and educational. The carbon ring at the throat was even worse than I’d seen on Jeff’s scope, a distinct band of hard, baked-on carbon buildup right where the bullet engages the rifling. The lands were crusty with carbon, and the grooves were filled with it. Moving further down the barrel, copper fouling appeared as bronze-colored streaks that caught the LED light with a distinctive metallic sheen. Some areas looked reasonably clean, but others were a mess.
I spent probably 45 minutes on that first inspection, slowly rotating and advancing the probe, taking photos with the screen’s capture button, and basically giving myself a crash course in what the inside of a fouled barrel actually looks like. The 4.5-inch screen was perfect for this. Large enough to see clear details, bright enough that I didn’t need to dim the room lights, and the 854×480 resolution provided more than adequate image quality for identifying problems.
That inspection session taught me something crucial: patches coming out “clean” means absolutely nothing. I’d been fooling myself for years, thinking I was maintaining my rifles properly when I was really just pushing surface fouling around and calling it good enough.
The Deep Cleaning Project: Watching Fouling Disappear

Armed with visual evidence of my barrel’s condition, I embarked on a proper deep cleaning session. But this time, instead of cleaning blindly until patches looked clean, I cleaned with the borescope, checking progress every 15 minutes. This feedback loop completely changed my understanding of cleaning products and techniques.
I started with Bore Tech C4 Carbon Remover since carbon was obviously the primary problem. I wet the barrel, let it soak for 20 minutes, then ran a dozen strokes with a nylon brush. Patch out, and back to the borescope. Progress was visible, some of the lighter carbon deposits were gone but the heavy carbon ring at the throat barely looked different. This pattern repeated for hours. What I thought would be a one-hour cleaning session turned into an all-day project spread across a weekend.
The borescope revealed something important: different areas of the barrel responded differently to cleaning efforts. The mid-barrel section cleaned up relatively quickly. The throat area with that heavy carbon ring required aggressive scrubbing with JB Bore Paste applied with a nylon brush using short, focused strokes. The first few inches from the chamber were the most stubborn, requiring multiple treatments before I started seeing bare steel through the borescope.
For copper fouling, I switched to Bore Tech Eliminator copper solvent. The borescope let me watch copper dissolve over time—areas that looked bronze-colored gradually returned to the gray of bare steel. This took patience because copper removal isn’t instant. Wet the barrel, let it soak, brush, patch out, inspect. Repeat until the borescope showed no more copper streaking.
After two days of intermittent cleaning—probably six hours of actual work time—the borescope finally showed me what I’d been hoping to see: a clean barrel. The lands were sharp and defined. The grooves were clear. The carbon ring was gone. The throat area, while showing some inevitable erosion from 800+ rounds, was clean of fouling. Copper streaks had vanished. The barrel looked like what I imagined “clean” should actually look like.
The next range session vindicated all that effort. My .308 was back to printing half-MOA groups with no fliers. The accuracy problem had been entirely fouling-related, and I never would have known the extent of the problem without visual confirmation from the borescope.
Learning the System: Tips from Three Years of Regular Use

After three years of using this Teslong borescope on more than two dozen different rifles, I’ve developed a systematic approach that maximizes its value. Here’s what I’ve learned through experience rather than instruction manuals.
Start every inspection with LED brightness at 50% and adjust from there. My first few inspections, I cranked the LEDs to maximum, thinking more light was better. Wrong. Maximum brightness in a polished stainless barrel creates glare that washes out details. In a heavily fouled barrel, maximum brightness can help penetrate the crud, but usually 60-70% brightness provides the best image. I adjust dynamically as I move through the barrel, brighter in heavily fouled areas, dimmer in polished sections.
Clean the probe and mirror before and after every use. This seems obvious, but I’ve caught myself getting lazy about it. Fouling from previous inspections on the probe or mirror creates false readings that make every barrel look dirty. A quick wipe with isopropyl alcohol and a microfiber cloth keeps the camera lens and mirror crystal clear. The mirrors are delicate. I learned this by breaking one when I dropped the borescope on my concrete garage floor—but with careful handling they last indefinitely.
Document everything with photos and videos. The screen makes capturing images dead simple. Just press the photo button. I’ve built a photo library of my barrels at different round counts and in various states of cleaning. This documentation has been incredibly valuable for understanding how my specific rifles and ammunition combinations create fouling patterns. I can compare current barrel condition to photos from six months ago and see how throat erosion is progressing or whether my cleaning regimen is keeping fouling under control.
Inspect before cleaning, during cleaning, and after cleaning. The before image shows what you’re dealing with. The during-cleaning images , taken every 15-20 minutes during aggressive cleaning sessions show whether your products and techniques are actually working. The after image confirms success or tells you to keep going. This three-stage approach taught me more about barrel cleaning in a month than a decade of blind patch-running ever did.
Mark probe insertion depth for consistency. I use a small piece of electrical tape on the probe shaft to mark specific depths usually at 2, 4, and 6 inches from the breech. This lets me compare the same sections of barrel during before/after inspections rather than comparing different areas and drawing false conclusions about cleaning effectiveness.
Rotate systematically, not randomly. When I first started using the borescope, I’d just stick it in and glance around haphazardly. Now I rotate the probe in 90-degree increments at each depth, ensuring I inspect the entire circumference. Fouling doesn’t distribute evenly, one section of rifling might be heavily fouled while the opposite side looks clean. Systematic rotation ensures you see everything.
Real-World Applications: Where This Borescope Saved Me Money
Beyond just improving my cleaning routine, this Teslong borescope has saved me significant money and prevented bad decisions in several real-world scenarios.
Used Gun Inspections: I bring my borescope to every private sale and gun show where I’m considering a used rifle purchase. Sellers who claim “low round count” or “lightly used” often have no idea about actual barrel condition. I’ve walked away from three rifles in the past two years that looked great externally but showed severe pitting, fire-cracking, or throat erosion that would have required immediate barrel replacement. I’ve also confidently bought rifles that sellers claimed had “high round counts” but the borescope revealed barrels in excellent condition that just needed thorough cleaning.
One memorable experience involved a Remington 700 in .300 Win Mag that a guy was selling for $450 because “it won’t group anymore.” I brought my borescope, inspected the barrel, and found it absolutely choked with copper fouling but otherwise in good condition. The throat showed minimal erosion. I offered $350, spent a weekend deep-cleaning the barrel, and now own a sub-MOA magnum rifle that cost me less than many scope rings. The borescope paid for itself three times over on that single purchase.
Carbon Ring Discovery: My 6.5 Creedmoor developed a velocity inconsistency problem that was making me really mad. Chronograph readings showed extreme spread jumping from 15 fps to 45 fps with the same ammunition that had previously been consistent. I checked everything; seating depth, powder charges, brass prep, before finally scoping the barrel. There was a pronounced carbon ring at the throat causing erratic pressure spikes. After aggressive carbon removal using the techniques I’d learned with visual feedback, velocity consistency returned to normal. Without the borescope, I might have wasted hundreds of dollars chasing that problem through load development or even considered barrel replacement.
Barrel Break-In Verification: There’s endless debate about whether barrel break-in protocols are necessary or just gun-writer mythology. The borescope let me actually test this on a new Bergara barrel. I did one inspection before firing a single round (seeing the factory finish and tooling marks), then followed Bergara’s break-in procedure while inspecting after every 5 rounds. The borescope showed me exactly how copper fouling decreased over the first 50 rounds as the barrel smoothed out. Whether this improved ultimate accuracy is debatable, but I could objectively watch the barrel behavior change during break-in rather than following the procedure on faith alone.
Cleaning Product Testing: Marketing claims about cleaning products are often exaggerated garbage. The borescope gave me objective evidence about what actually works. I discovered that some expensive boutique copper solvents worked no better than cheaper alternatives. I learned that my favorite carbon cleaner was leaving residual carbon in the throat area that required supplemental scrubbing with JB Paste. I found that certain brushing techniques were far more effective than others. These lessons came from direct visual observation rather than faith in product claims or internet forum arguments.
Image Quality: What You Actually Get vs. Marketing Claims
Let’s talk honestly about image quality because this is where expectations need to be realistic. Teslong markets 1920×1080 image capture and 1280×720 video recording. These numbers sound impressive until you remember you’re viewing this through a fixed-focus 1-megapixel camera looking at a curved steel surface inside a dark tube.
The practical reality is that image quality is good, not spectacular, not professional-grade, but definitely good enough for every barrel inspection task you need to perform. You can clearly distinguish between carbon fouling (appears dark, sooty, sometimes crusty) and copper fouling (appears bronze to reddish-brown with metallic sheen). You can see throat erosion, fire-cracking patterns, pitting, tooling marks from manufacturing, and general barrel condition. You can identify carbon rings at the throat. You can watch fouling gradually disappear during cleaning sessions.
What you won’t get is razor-sharp, perfectly color-calibrated imagery like you’d see in gunsmithing textbooks or professional barrel inspection services. There’s some softness at the edges of the field of view. Colors are good but not perfectly accurate, copper sometimes appears more brown than bronze depending on LED brightness. Heavily polished stainless barrels can create glare even at lower LED settings. The fixed focus means you need the probe positioned at the optimal distance (which the side-view mirrors handle automatically), and learning that sweet spot takes a few inspection sessions.
But here’s the critical point: despite these limitations, the image quality is more than adequate for practical use. I’ve never looked at an image and thought, “I can’t tell what I’m seeing here.” The LED ring lights are genuinely bright and create excellent illumination inside the darkest barrels. The 70-degree field of view provides a good perspective on barrel condition. The side-view mirrors position the camera perfectly for viewing rifling in profile, which is where fouling accumulates.
Compare this $130 borescope to professional systems costing $600-1000, and yes, the premium systems deliver better optical quality. But the information you need for barrel maintenance, is there carbon? Is there copper? How bad is the throat erosion?—is equally visible through both. The Teslong shows you that information at a fraction of the price.
Check Price on AmazonMaintenance and Durability: Three Years Later

After three years of regular use, probably 100+ barrel inspections, my Teslong borescope is still functioning perfectly. The screen shows no degradation in brightness or image quality. The battery still holds a full charge and delivers the same 3-4 hours of use. The probe remains flexible yet rigid, with no kinks or damage despite being coiled and uncoiled countless times.
I have broken exactly one side-view mirror by dropping the borescope on concrete. The mirror shattered while everything else remained undamaged. I ordered a replacement mirror set for $15 and was back in business. This is the only real weakness—the mirrors are small, delicate accessories that require careful handling. Store them in the provided case slots rather than loose in your cleaning kit, and they’ll last indefinitely.
The probe itself has proven remarkably durable. I was initially concerned about the camera lens getting scratched or the LEDs failing, but neither has happened despite less-than-gentle treatment. The IP67 waterproof and dust-resistant rating seems accurate. I’ve cleaned the probe with solvent-soaked patches multiple times with no issues. The stainless steel construction resists corrosion even in my garage’s variable humidity.
The carrying case remains in excellent condition despite being thrown in the back of my truck for transport to the range multiple times. The foam inserts still hold everything securely. The zipper works smoothly. This case was clearly designed for real-world use rather than just looking good in product photos.
One minor complaint: the probe connection to the screen could be more robust. It’s a threaded aviation-style connector that works fine but occasionally loosens slightly during use, requiring you to snug it up. This is a minor inconvenience rather than a real problem, but a more positive-locking connector would be an improvement.
Who Should Buy This Specific Teslong Model

After three years of experience with this exact model, I can confidently recommend it for specific types of shooters:
Best for: Rifle owners who want self-contained, standalone operation without smartphone connectivity. Shooters who clean multiple rifles regularly and want visual verification of barrel condition. Hunters who buy and sell used rifles and need portable barrel inspection capability. Anyone who’s serious about rifle maintenance and wants to actually see what’s happening inside their barrels.
Perfect for: Shooters with any rifle from .22 caliber up through magnum cartridges. The 45-inch flexible probe handles even very long barrels with ease. The 0.2-inch probe diameter fits .22 caliber and larger. The included mirrors cover .22, .30, and .38 calibers, which addresses most common rifle calibers (you can order additional mirror sizes separately if needed).
Not ideal for: Shooters who prefer smartphone connectivity for larger screen display or easier file sharing. Those who want the absolute best possible image quality and are willing to pay 3-5x more for premium systems. Pistol-focused shooters might prefer Teslong’s shorter rigid pistol probe models rather than the 45-inch flexible rifle probe.
Especially valuable for: Long-range precision shooters who need to monitor throat erosion and carbon ring formation. Competitive shooters who shoot high volumes and need to verify cleaning effectiveness. Anyone who’s struggled with accuracy degradation and suspects barrel fouling. Shooters who want to eliminate the guesswork from barrel maintenance.
Ready to Transform Your Rifle Maintenance? Here’s How to Get Started
Check Price on AmazonAfter sharing my three-year journey with this borescope, you’re probably wondering if it’s the right investment for you. Let me make this simple: if you own rifles you care about and you’re serious about maintaining them properly, this tool will change how you approach barrel care forever.
The Teslong Rifle Borescope with 4.5″ Screen is currently available and represents one of the best values in rifle maintenance equipment. At around $130, you’re getting a complete, professional-grade inspection system that would have cost $500-1000 just a decade ago. No smartphone required, no connectivity hassles, no monthly subscriptions, just a tool that works every single time you turn it on.
What You’re Getting: Teslong Rifle Borescope Review
- Complete stand-alone system with 4.5″ HD screen
- 45-inch flexible probe that inspects any rifle barrel
- 0.2-inch diameter fits .20 caliber and larger
- Adjustable LED ring lights for perfect illumination
- Three caliber-specific side-view mirrors (.22, .30, .38)
- 32GB micro SD card for storing inspection photos and videos
- Rechargeable battery with 3-4 hours runtime
- Protective carrying case with fitted foam inserts
- Everything you need to start inspecting barrels immediately
Why Buy Now: Don’t wait until your accuracy degrades or you make a costly mistake on a used gun purchase. Every range session without this tool is a missed opportunity to learn about your barrel condition. Every cleaning session without visual confirmation is guesswork. Every used rifle inspection without a borescope is a gamble with your hard-earned money.
I wish I’d bought mine five years earlier. I would have caught my .308’s carbon ring problem before it affected accuracy. I would have saved money on cleaning products that don’t actually work. I would have avoided the frustration of troubleshooting accuracy problems blind. You can avoid all of that by starting with visual barrel inspection from day one.
Take Action Today: Check current pricing and availability for the Teslong Rifle Borescope with 4.5″ Screen. The investment is minimal compared to the value it delivers. Your rifles deserve proper maintenance, and you deserve the peace of mind that comes from actually seeing what’s happening inside your barrels.
Remember: patches coming out “clean” means nothing. Trust your eyes, not your assumptions. Get the tool that lets you see the truth.
Check Price on AmazonFinal Verdict: Teslong Rifle Borescope Review
Looking back at three years of use, I genuinely wish I’d bought this Teslong borescope five years earlier. The improvement in my rifle maintenance, the money saved on used gun purchases, the accuracy problems diagnosed and fixed, the education gained from actually seeing what happens inside barrels, all of this has been worth exponentially more than the $130 purchase price.
This specific model—the Teslong Rifle Borescope with 4.5″ Screen, 0.2-inch probe, 45-inch flexible cable, hits a sweet spot of capability, convenience, and value that’s hard to beat. The stand-alone screen eliminates connectivity hassles while still delivering excellent image quality. The flexible probe handles any rifle barrel length. The LED ring lights provide genuinely bright, adjustable illumination. The included mirrors work perfectly for side-view barrel inspection. The build quality has proven durable through years of use.
Is it perfect? No. The mirrors are delicate. The image quality doesn’t match $600 premium systems. There’s a learning curve before you’ll get consistently good images. But the practical reality is that this borescope delivers everything you need for rifle barrel inspection at a price that makes it accessible to any serious shooter.
The transformative aspect is moving from blind barrel maintenance based on hope and tradition to visual, evidence-based cleaning. You’ll learn which products actually work in your specific barrels. You’ll understand when barrels are truly clean versus when you’re just tired of cleaning. You’ll catch problems early before they cascade into accuracy degradation. You’ll make informed decisions about barrel replacement based on actual throat erosion rather than guesswork.
My .308 Winchester that started this whole journey? It’s still shooting half-MOA groups three years later because I now maintain it properly with visual confirmation of barrel condition. That alone justified this purchase. Everything else has been bonus value.
If you own rifles you care about, if you value accuracy, if you want to actually maintain your equipment properly rather than just hoping your cleaning routine is adequate, buy this borescope. Spend the $130, learn to use it properly, and prepare to have your eyes opened about what’s really happening inside your rifle barrels. You’ll never go back to blind cleaning again.